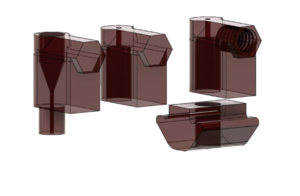
Autopilot Hex Panel Pegs
| Autopilot Hex Panel Pegs | |
|---|---|

| |
| Modality | Enclosures |
| Schematic Type | 3D CAD |
| Description | Pegs to mount hex panels |
| Creator | Jonny Saunders |
| Version | 1 |
| Date | 2021-08-03 |
| Repository | https://github.com/auto-pi-lot/autopilot-hardware |
| Git Hash | f4018b8 |
| Used In: | Autopilot Behavior Box |
| Remixes: | |
| .STL | |
|---|---|
| .STEP | |
| Other Files |
Pegs
Pegs to mount Autopilot Hex Panels to themselves and 80/20 pieces!!!
Each of the pegs fits into the smaller hexagonal hole in the hex panel near the corner. We typically attach these with Super Glue but there is a threaded version in the .step file.
They come in two flavors:
- Peg-body-peg-solid.stl - this piece is held in place with its peg through a hole, typically those of the Behavior Panel Bottom.
- Peg-body-magnet-solid.stl - this piece holds D36 Magnet s to be held in place against a rail piece
The peg-rail.stl piece also fits a D36 Magnet, and slides into a 80/20 - 1010 series T-slotted aluminum bar.
And look they all stack together!!!!
Braces
The panel-brace pieces slide into a 80/20 - 1010 bar as well and are used to hold the top panel up -- magnets proved to be too weak and the pegs too easily broken.
Fabrication Notes
Drainage holes have been added for SLA printing, as well as to release pressure when magnets are being inserted. We recommend that the "top," or the side with the hexagonal peg, is printed on the bottom.
The tolerance for the peg for the top brace may need to be adjusted on your printer, as it's a friction-fit piece!
