Difference between revisions of "Autopilot Panel Handle"
From Autopilot Wiki
| (One intermediate revision by the same user not shown) | |||
| Line 1: | Line 1: | ||
{{Schematic | {{Schematic | ||
| + | |Image=side_handle_real.jpg | ||
|Modality=Enclosures | |Modality=Enclosures | ||
|Schematic Type=3D CAD | |Schematic Type=3D CAD | ||
| − | |Short Description= | + | |Short Description=Handles to attach to Autopilot Hex Panels |
|Creator=Jonny Saunders | |Creator=Jonny Saunders | ||
|Version=2 | |Version=2 | ||
| − | |Submitted Date=2021 | + | |Submitted Date=2021-06-28 |
}} | }} | ||
{{3D CAD | {{3D CAD | ||
| − | |.STL= | + | |.STL=Autopilot_panel_handle.stl, panel_handle_side.stl |
| − | |.STEP= | + | |.STEP=Autopilot_panel_handle.step, panel_handle_side.step |
| + | }} | ||
| + | Two versions | ||
| − | + | * The center version is good for one-handed manipulation, and can be thought of as the ''classic handle'' | |
| + | * The side version is better for the current design of the [[Autopilot Hex Panel]] which uses two of the magnetic [[Autopilot Hex Panel Pegs||pegs]] at the top. This makes the center handle put a lot of strain on the acrylic, and the side handles distribute it much better. The side handles also STACK!!!!!!! so your panels don't become a jumbled mess. | ||
==Fabrication Notes== | ==Fabrication Notes== | ||
'''SLA''' - I print vertically (long axis up and down w.r.t build plate), many can fit close together if alternated directions. | '''SLA''' - I print vertically (long axis up and down w.r.t build plate), many can fit close together if alternated directions. | ||
| Line 17: | Line 21: | ||
'''Additive''' - No supports should be needed for overhang in center typically. The main point of failure when printed horizontally (back face on build plate) is that the top "handle" part can be ripped off with excessive force, but this doesn't happen with typical usage. | '''Additive''' - No supports should be needed for overhang in center typically. The main point of failure when printed horizontally (back face on build plate) is that the top "handle" part can be ripped off with excessive force, but this doesn't happen with typical usage. | ||
| − | + | Can be attached anywhere, the hexagonal cutouts typically aligned with the openings on the panel, and usually placed near the top edge. We usually just [[Uses Material::Super Glue]] it!!!! | |
Latest revision as of 02:00, 4 August 2021
| Autopilot Panel Handle | |
|---|---|

| |
| Modality | Enclosures |
| Schematic Type | 3D CAD |
| Description | Handles to attach to Autopilot Hex Panels |
| Creator | Jonny Saunders |
| Version | 2 |
| Date | 2021-06-28 |
| Repository | |
| Git Hash | |
| Used In: | Autopilot Behavior Box |
| Remixes: | |
| .STL | |
|---|---|
| .STEP | |
| Other Files |
Two versions
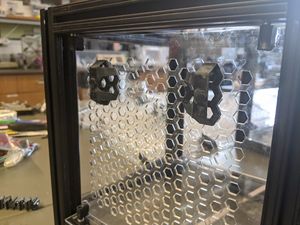
- The center version is good for one-handed manipulation, and can be thought of as the classic handle
- The side version is better for the current design of the Autopilot Hex Panel which uses two of the magnetic |pegs at the top. This makes the center handle put a lot of strain on the acrylic, and the side handles distribute it much better. The side handles also STACK!!!!!!! so your panels don't become a jumbled mess.
Fabrication Notes
SLA - I print vertically (long axis up and down w.r.t build plate), many can fit close together if alternated directions.
Additive - No supports should be needed for overhang in center typically. The main point of failure when printed horizontally (back face on build plate) is that the top "handle" part can be ripped off with excessive force, but this doesn't happen with typical usage.
Can be attached anywhere, the hexagonal cutouts typically aligned with the openings on the panel, and usually placed near the top edge. We usually just Super Glue it!!!!
... more about "Autopilot Panel Handle"